


Palette Knife Cookie Decorating Tutorial | Floral & Sunset Cookies
- Sarah Roberts
- Aug 19, 2025
- 2 min read
If you’ve ever wanted to try palette knife painting on cookies, this tutorial will walk you through the exact process I used to create floral cookies with dreamy sunset skies. These cookies combine simple royal icing techniques with palette knife artistry to create edible works of art—and they’re surprisingly beginner-friendly once you break it down step by step!
Whether you’re a home baker, a cookie decorating beginner, or just looking for a new creative project, you’ll love this cookie decorating idea. Plus, I’ll share the exact palette knives and staging props I used so you can easily recreate this look at home.
What You’ll Need
Royal icing in 20-second (flooding) and thick (straight-from-the-mixer) consistencies
Food coloring in yellows, peaches, purples, pinks, and greens
Palette knives (I used this set of pointed and flat palette knives from Amazon—perfect for cookie decorating!)
Piping bags (tipless bags work great here)
A flat cookie surface (round or square sugar cookies are best)
Vintage-style props & antique dupes for staging photos
Step 1: Base Flood with Royal Icing
Start by flooding each cookie with 20-second consistency royal icing for a smooth base.
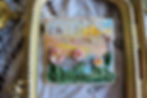
For the sunset effect, add a touch of yellow icing and use the wet-on-wet technique to blend it softly into the background. For the daytime cookies, keep it light with yellows and whites.
Allow the flooded cookies to dry completely before moving on.
Step 2: Add Clouds with a Palette Knife
Using thicker royal icing (straight from the mixer), spread cloud shapes across the dry background with a flat palette knife.
For sunset skies, layer on peaches and purples for dimension.
For daytime skies, stick with whites and pale yellows for a sunshine glow.
The palette knife helps create natural, textured layers that feel painterly and artistic.
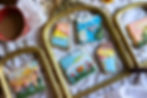
Step 3: Create Flowers & Leaves

Once the clouds are set, it’s time to add florals:
Use a pointed palette knife with varied shades of green royal icing to swipe out leaves.
With your smallest palette knife, build delicate flower petals. I used pinks, yellows, and touches of green for clusters of hydrangea-style flowers.
The beauty of this technique is that each swipe of icing creates dimension—you don’t need perfection to get beautiful results.
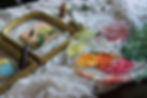
Step 4: Style & Photograph
To finish, I styled the cookies with antique-inspired props. Instead of hunting the originals that I found at my local antique store, I curated some affordable Amazon dupes that give the same cozy, timeless feel for you.
Here are a few favorites:https://amzn.to/45Lkh3m
These little details make your cookies look stunning in photos, perfect for sharing with friends, family, or on social media.
Final Thoughts
This cookie set reminded me that sometimes, even when projects don’t go perfectly, the results can still be beautiful. The sunset skies, palette knife florals, and antique staging came together to create one of my favorite cookie designs yet.
If you’re ready to try palette knife cookie decorating, grab a set of palette knives and some royal icing, and let your creativity lead the way. And if you’d like to shop the exact tools and props I used, I’ve linked them above so you can get started right away.
Happy decorating, friend!